How To Create Layered Lighting begins with one simple idea: a room should never depend on a single, glaring fixture. Instead, light should arrive from different heights, directions, and intensities. Ambient lighting establishes overall visibility. Task lighting supports practical work. Accent lighting adds emphasis, depth, and atmosphere. Together, these layers can make a small living room feel calmer, a kitchen safer, and a bedroom more restful.
Architectural lighting pioneer Richard Kelly described light as “the magical ingredient that makes or breaks a space.” His observation still matters today. A pendant above a dining table, warm under-cabinet strips, and a small wall lamp can create useful contrast without overwhelming the room. During my own lighting evaluations, I have noticed that people often install attractive fixtures first and consider glare later. That order can cause uncomfortable reflections on televisions, mirrors, and polished countertops. It is worth reconsidering.
This guide presents seven practical tips for How To Create Layered Lighting, from choosing a flexible base layer to positioning focused task lights. It also considers color temperature, dimmers, beam direction, and fixture scale. Small details matter. A 2700K lamp can soften an evening corner, while a brighter neutral tone may help with food preparation. Still, there is no universal formula. A layout that works beautifully in one home may feel flat in another. Test the light after sunset, observe the shadows, and adjust slowly. Good lighting is not merely decoration. It shapes comfort, function, and the way people experience a space.
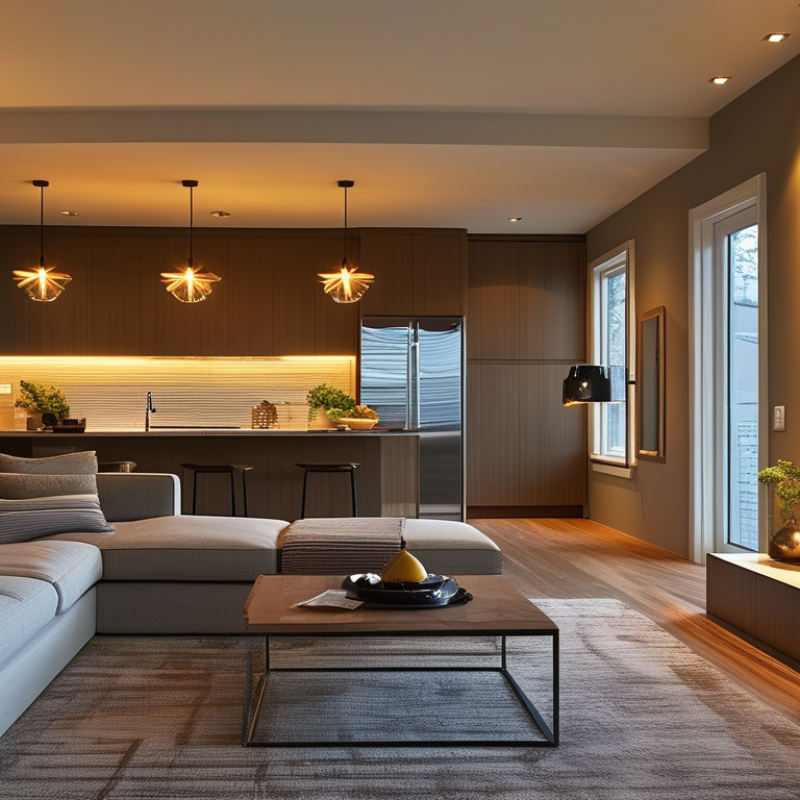
Define the purpose and mood before choosing fixtures. A kitchen needs clear task lighting for chopping, washing, and reading recipes. A bedroom should feel quieter, with softer light near the bed. Start with ambient lighting, then add task lighting where activities happen. Under-cabinet light can reduce shadows across a countertop. In a study, position a desk lamp beside your writing hand, not directly behind it. Small decisions matter.
Add accent lighting to reveal texture, artwork, or architectural details. A narrow beam can highlight a stone wall, while concealed light can soften a ceiling edge. Use warm color temperatures in resting areas and more neutral light where concentration matters. However, color can look different against wood, paint, and fabric. Test samples at night. Daylight often hides problems.
Install dimming controls when possible, because one setting cannot serve every mood. Keep each layer useful on its own, then combine them for flexibility. Avoid placing every light in a single ceiling grid. It can make a room feel flat and overly bright. I once preferred dramatic contrast in a lounge, but the shadows became inconvenient during cleaning. That changed my approach. Review the room after dark, move through its real activities, and adjust brightness, glare, and switch locations before final installation.
Plan ambient lighting before choosing decorative fixtures. It establishes the room’s visual baseline and prevents harsh pools of brightness. The International Energy Agency reports that lighting uses about 15% of global electricity. Efficient planning matters.
Start with the room’s purpose, ceiling height, daylight, and surface colors. Place general light near the ceiling, then spread it across walls instead of aiming everything downward. Use several modest sources. A central fixture alone often leaves dark corners. Select warm, dimmable light for living areas, and brighter neutral light for kitchens or work zones. Keep the fixture size proportional to the room. A small ceiling light can look lost above a large table. I have made that mistake.
Check the light at night, not only in a showroom. Walk from the doorway to the sofa and notice glare on screens, mirrors, and polished floors. The U.S. Department of Energy states that LED lighting uses at least 75% less energy than traditional incandescent lighting, while lasting much longer. Add controls that support low, medium, and full output. Connect ambient light with task and accent layers, but let ambient light remain the quiet foundation. Leave flexibility for seasonal daylight changes. Measure the room’s brightness if possible; the Illuminating Engineering Society provides illuminance guidance for residential tasks, though comfort still depends on age, contrast, and personal sensitivity. Too much light is not always better.
Task lighting should follow the activity, not simply fill an empty corner. A desk needs clear light on documents, while a kitchen counter needs even illumination across the cutting area. Place the fixture slightly to the side of your dominant hand. This reduces shadows while you write, measure, or prepare food. Keep the light source above eye level, but angle it away from reflective screens and polished surfaces.
Use adjustable fixtures when one space serves several purposes. A reading chair may need a narrow beam, while a craft table benefits from broader coverage. Choose a comfortable color temperature, usually around 2700K to 4000K, depending on the room and task. Dimming also matters because eyesight and daylight conditions change throughout the day. Brightness should feel controlled, not harsh.
My first lighting plan looked balanced from the doorway. It failed at the work surface. The cabinet edge created a dark strip exactly where most chopping happened. I corrected it by moving the fixture forward and adding diffusion. That small change improved visibility without increasing glare. Measure the surface before installation, and test the light at night. A technically bright fixture can still create tiring shadows. Electrical work should follow local safety requirements and use qualified help when wiring is involved.
How to Create Layered Lighting: 7 Tips
Use Accent Lighting to Highlight Key Features
Layered lighting combines ambient, task, and accent sources. Accent lighting gives a room its visual direction. Use it to frame artwork, reveal textured walls, or draw attention to a staircase. A narrow beam can make a ceramic vase feel intentional. A wider beam creates softer emphasis. Test both before fixing the fitting.
The U.S. Department of Energy reports that LED lighting uses at least 75% less energy than incandescent lighting and lasts up to 25 times longer. That efficiency supports frequent accent use without careless energy waste. Still, brightness alone is not the goal. The Illuminating Engineering Society recommends considering illuminance, contrast, glare, and visual comfort together. Aim the beam slightly across a surface, rather than directly into eye level. Keep reflections away from glass frames and polished tables.
Walk through the room at night.
A practical seven-point check helps: select a feature, choose beam spread, set mounting height, control glare, balance color temperature, add dimming, and review shadows. Dimming matters because a gallery wall may need drama at dinner, but less intensity during conversation. I often over-light the first test. It looks impressive, then feels tiring. Reduce the output by 20 to 30 percent and reassess from the doorway. The lighting may become quieter, but the feature usually becomes clearer. Record the final positions, because small shifts can change the entire composition.
A practical lighting guide for combining ambient, task, and accent illumination in residential spaces.
| Tip | Lighting Layer | Recommended Target | Best Placement | Practical Design Action |
|---|---|---|---|---|
| 1. Establish a comfortable base | Ambient lighting | Approximately 100–300 lux for general residential areas | Ceiling fixtures, indirect cove lighting, or evenly distributed wall lights | Use dimmable fixtures so the overall brightness can change from daytime to evening. |
| 2. Light work surfaces first | Task lighting | Approximately 300–500 lux for reading, food preparation, and desk work | Under cabinets, above desks, beside mirrors, or directly over worktops | Position the light in front of the user where possible to reduce shadows on the task. |
| 3. Highlight key features | Accent lighting | Aim for roughly 3:1 accent-to-surrounding-light contrast for visual emphasis | Artwork, shelving, textured walls, plants, fireplaces, and architectural details | Use adjustable spotlights or wall washers and direct the beam precisely at the feature. |
| 4. Select a suitable color temperature | All layers | 2700–3000 K for warm residential interiors; 3000–4000 K for a crisper work area | Coordinate the color temperature across fixtures in the same visual zone | Avoid mixing visibly different white tones unless the contrast is intentional. |
| 5. Protect color quality | Accent and task lighting | CRI 80 or higher for general interiors; CRI 90 or higher for artwork and detailed finishes | Art displays, dressing areas, kitchens, bathrooms, and material samples | Choose high-color-rendering light sources to keep fabrics, skin tones, and artwork looking natural. |
| 6. Control beam spread and glare | Accent lighting | Approximately 15–30° for focused spotlighting; 30–45° for broader feature washing | Aim from the ceiling or an adjacent wall toward the selected feature | Use shielding, recessed trims, or cross-lighting to minimize reflections and harsh hot spots. |
| 7. Add flexibility and control | Integrated lighting system | Use separate switching or dimming for ambient, task, and accent circuits | Place controls near room entrances and primary seating or work zones | Create preset scenes such as “Relax,” “Work,” and “Display” to adjust layers independently. |
Layered lighting works best when each light has a clear job. Ambient light fills the room, task light supports precise work, and accent light adds depth. In my own room tests, a warm ceiling fixture made wood surfaces feel inviting. Yet the same warmth made white walls look yellow. Color balance matters more than decorative style. Choose one main color temperature, then vary it carefully. I often keep general lighting near 2700–3000K and use neutral task light only where focus is needed. The transition should feel intentional, not accidental.
Brightness needs a hierarchy. The brightest area should guide attention without causing glare. A reading chair may need stronger light than a hallway, but it should not overpower nearby seating. Use dimmers when possible, because evening comfort changes quickly. Start with moderate output, then lower it after sunset. I once installed accent lights too brightly and noticed reflections on the television and polished table. The room looked impressive for ten minutes. It became tiring afterward. That mistake taught me to judge lighting from seated eye level, not from the installation point.
Control connects every layer. Separate switches or scenes let you shift from cooking to conversation without rebuilding the atmosphere. Place controls near room entrances and frequently used seating. Test each setting at night, when shadows reveal problems. Light aimed at artwork may spill onto a wall, while a floor lamp may leave the ceiling dull. Small adjustments help: rotate a shade, reduce one layer, or add a softer source behind furniture. Perfect balance is rarely achieved immediately. It develops through observation, adjustment, and a willingness to admit that brighter is not always better.
Layered lighting combines ambient, task, and accent light. Each layer performs a different job. Together, they create flexibility and depth.
Kitchens need clear light for chopping, washing, and reading recipes. Bedrooms benefit from softer light near the bed. Study areas need focused illumination.
Place a desk lamp beside your writing hand. Avoid positioning it directly behind you. Under-cabinet lighting can reduce countertop shadows.
Accent lighting can emphasize artwork, stone, textured walls, staircases, or a ceramic vase. Narrow beams create stronger focus. Wider beams feel gentler.
Aim beams across surfaces instead of directly toward eye level. Keep reflections away from glass frames and polished tables. Check the room from seated positions.
Warm light often suits bedrooms and resting areas. More neutral light can support concentration. Test samples at night because daylight hides color problems.
One brightness level cannot suit cooking, conversation, reading, and cleaning. Separate controls let you change the atmosphere quickly. Controls should be easy to reach.
Walk through the room after dark. Try real activities, such as reading, cleaning, and sitting near a television. Lower overly bright accent lighting and reassess.
Avoid putting every fixture into one ceiling grid. The room may look flat and harsh. I once preferred dramatic shadows, but cleaning became inconvenient.
No. Brightness should guide attention without causing glare or fatigue. Reduce excessive output by 20 to 30 percent, then observe again. Sometimes quieter light works better.
How To Create Layered Lighting begins with understanding the purpose and mood of each room. Start by deciding how the space should feel and what activities it must support, then build a flexible lighting plan around those needs. Use ambient lighting as the foundation to provide comfortable, overall illumination without creating harsh shadows. Next, add task lighting in areas where focused visibility is important, such as reading, cooking, working, or grooming. This makes everyday activities easier and helps reduce eye strain.
Complete the design with accent lighting that draws attention to architectural details, artwork, textures, or other meaningful features. For a cohesive result, balance the color temperature, brightness, and direction of every layer. Include adjustable controls whenever possible so the atmosphere can change throughout the day. By combining these elements thoughtfully, layered lighting can make a room more functional, welcoming, and visually balanced while allowing the same space to support different moods and purposes.

Boray Light